2014年9月13日 星期六

解決 Debian packaging 過程中的 compiler-flags-hidden 警告訊息

compiler-flags-hidden 警告訊息的說明在 https://qa.debian.org/bls/bytag/W-compiler-flags-hidden.html 可以看到。

裡面提到的

可以參考一下,其主要的目的是要盡可能地強化執行檔的安全性。

以 x11-touchscreen-calibrator 0.2-1 為例,將其編譯導向某個檔案儲存,然後再使用 blhc 指令來檢查,就可以看到:

$ blhc --all --color ../log
NONVERBOSE BUILD:   CC       x11_touchscreen_calibrator-x11-touchscreen-calibrator.o
NONVERBOSE BUILD:   CCLD     x11-touchscreen-calibrator

因為 x11-touchscreen-calibrator 上游將 Automake Silent Rules 預設開啟,然後 x11-touchscreen-calibrator 又只使用最簡單的 debian/rules 如下:

#!/usr/bin/make -f                                                                                                                                      
# -*- makefile -*-

%:
        dh  $@

然而 debhelper 到了 9.20140817 預設上還是不會將 --disable-silent-rules 自動加上使用,請見 https://wiki.debian.org/ReleaseGoals/VerboseBuildLogs 的資料。

不過在 Debian Bug report logs - #751207 在有設定 DH_VERBOSE 且 DH_VERBOSE 的值不為空字串的條件下,會自動加上 --disable-silent-rules,所以將 debian/rules 改寫成如下:

#!/usr/bin/make -f                                                                                                                                      
# -*- makefile -*-

export DH_VERBOSE=1

%:
        dh  $@

這樣就可以將 --disable-silent-rules 加上,而且有更詳細的套件包裹編譯過程,不過 blhc 的檢查還是會看到其它的訊息:

$ blhc --all --color ../log
CFLAGS missing (-fPIE): gcc -DHAVE_CONFIG_H -I.   -D_FORTIFY_SOURCE=2  -g -O2 -fstack-protector --param=ssp-buffer-size=4 -Wformat -Werror=format-security -c -o x11_touchscreen_calibrator-x11-touchscreen-calibrator.o `test -f 'x11-touchscreen-calibrator.c' || echo './'`x11-touchscreen-calibrator.c
LDFLAGS missing (-fPIE -pie -Wl,-z,now): libtool: link: gcc -g -O2 -fstack-protector --param=ssp-buffer-size=4 -Wformat -Werror=format-security -Wl,-Bsymbolic-functions -Wl,-z -Wl,relro -o x11-touchscreen-calibrator x11_touchscreen_calibrator-x11-touchscreen-calibrator.o  -lX11 -lXi -lXrandr

這時候就可以將 debian/rules 改成如下:

#!/usr/bin/make -f                                                                                                                                      
# -*- makefile -*-

export DH_VERBOSE=1
export DEB_CFLAGS_MAINT_APPEND=-fPIE
export DEB_LDFLAGS_MAINT_APPEND=-fPIE -pie -Wl,-z,now

%:
        dh  $@

這樣就可以將缺少的 CFLAGS 跟 LDFLAGS 參數加入使用。

最後我們可以使用 hardening-check 來檢查一下執行檔。

使用前:

$ hardening-check /usr/bin/x11-touchscreen-calibrator 
/usr/bin/x11-touchscreen-calibrator:
 Position Independent Executable: no, normal executable!
 Stack protected: yes
 Fortify Source functions: yes
 Read-only relocations: yes
 Immediate binding: no, not found!

使用後:

$ hardening-check /usr/bin/x11-touchscreen-calibrator 
/usr/bin/x11-touchscreen-calibrator:
 Position Independent Executable: yes
 Stack protected: yes
 Fortify Source functions: yes
 Read-only relocations: yes
 Immediate binding: yes

這也是 W-compiler-flags-hidden 這個警告訊息想要讓我們做的事情,透過調整編譯時的參數來強化執行檔的安全性。

2014年9月4日 星期四

Lubuntu 14.04 的最小安裝

一般的 Lubuntu 14.04 安裝會順便安裝一些安排好的應用程式上去,如果想要自己調整的話,安裝完 Lubuntu 14.04 又要再手動去將不想要的應用程式移除掉,這樣的作法不但麻煩,而且會清得不夠乾淨,另外一方面也怕移除掉重要的系統元件,導致 LXDE 桌面環境無法正常使用,那麼就可以考慮使用 Lubuntu 的最小安裝模式。

作法很簡單,就是透過 netboot 來安裝,首先到 http://cdimage.ubuntu.com/netboot/ 上面找到自己想要的安裝方式,無論是透過 PXE 還是直接製作 bootable USB stick 都可以。

然後就啟動 netboot 的環境來安裝,而中間會有一個步驟讓你選擇想要安裝的套餐,如下圖(可以多選):

只要選擇 Lubuntu minimal installation 就可以了。

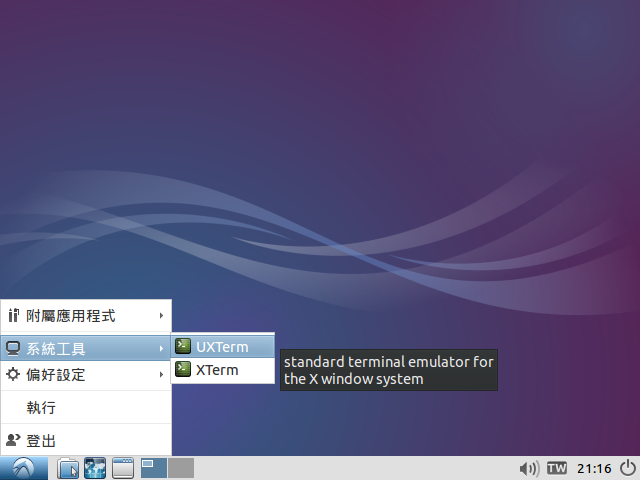
安裝完的桌面如下:


清爽的桌面。

檔案管理程式 PCManFM

XTerm 終端機程式

Openbox 組態管理器跟桌面偏好設定

至於其它的東西就打開 XTerm 再用 apt 程式來一個一個安裝上去就好了,相當清爽又簡潔,還沒有再安裝其它東西之前總共使用空間約 1.7 G。

補充資料:

2014年8月18日 星期一

在 Ubuntu 14.04 桌面環境上面設定 Exim4 使用 Gmail 來寄信

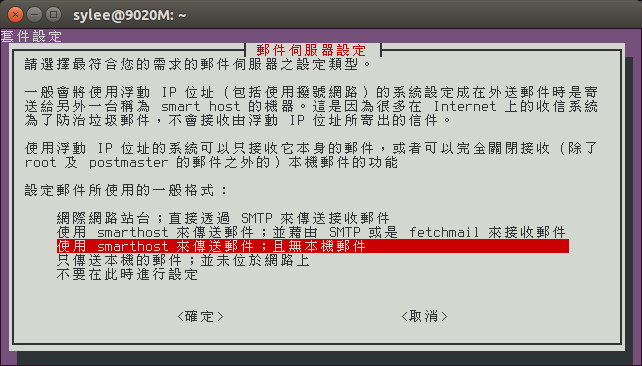
一般來說 Ubuntu 桌面環境安裝好就已經將 exim4 安裝在裡面了,只不過預設上是使用「只傳送本機的郵件;並未位於網路上」,如果要改用 Gmail 就要執行以下的指令。

$ sudo dpkg-reconfigure exim4-config

然後選擇「使用 smarthost 來傳送郵件;且無本機郵件」

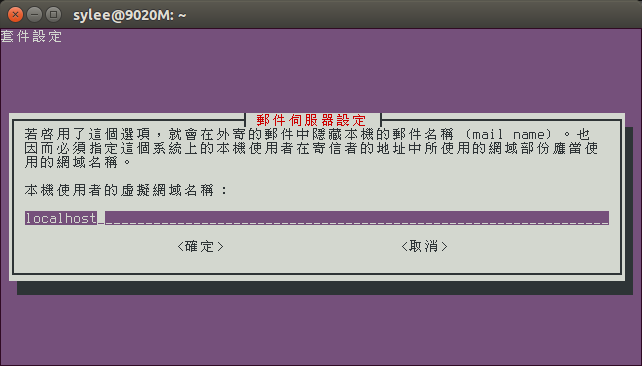
接下來的「系統郵件名稱 (mail name)」填入“localhost”

「在有 SMTP 連線傳入時,要進行監聽的 IP 位址」維持“127.0.0.1 ; ::1”

「要進行接收的其它郵件位址」填入空白

「本機使用者的虛擬網域名稱」維持“localhost”

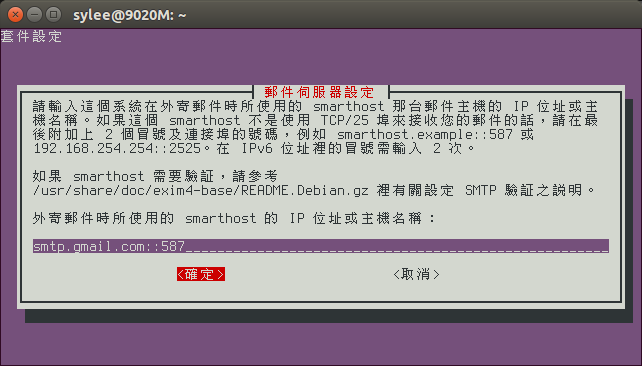
「外寄郵件時所使用的 smarthost 的 IP 位址或主機名稱」填入“smtp.gmail.com::587”

之後都用預設值,直到結束。

接下來使用以下指令來找出 Gmail 的 smtp 伺服器。

ubuntu@trusty:~$ host smtp.gmail.com
smtp.gmail.com is an alias for gmail-smtp-msa.l.google.com.
gmail-smtp-msa.l.google.com has address 74.125.25.108
gmail-smtp-msa.l.google.com has address 74.125.25.109
gmail-smtp-msa.l.google.com has IPv6 address 2607:f8b0:400e:c02::6d

然後就可以編輯 /etc/exim4/passwd.client 這個檔案,加入以下這行。

*.google.com:SMTPAccountName@gmail.com:y0uRpaSsw0RD

然後編輯一下 /etc/email-addresses 將自己本機上的帳號跟 Gmail 關聯起來。

$ echo "$(whoami): SMTPAccountName@gmail.com" | sudo tee -a /etc/email-addresses

最後再用以下指令,重新啟動 exim4 應該就可以寄信出去了。

$ sudo service exim4 restart

可以使用下面這個指令的寄給自己測試一下。

$ echo "This is a test mail." | mail -s "test mail" SMTPAccountName@gmail.com

P.S. 上面提到的 SMTPAccountName 請改成自己的帳號,y0uRpaSsw0RD 密碼可以到 https://security.google.com/settings/security/apppasswords 上面產生取得。

參考資料:https://wiki.debian.org/GmailAndExim4

2014年7月15日 星期二

在 Ubuntu 上面安裝 mainline kernels

所謂的 mainline kernels 就是在 The Linux Kernel Archives 上面由 Linus Torvalds 本人釋出的版本, 而 Ubuntu 本來有一個 Ubuntu Kernel PPA 專門用來編譯這些 mainline kernels, 只是後來不曉得為何就不再使用 PPA 改用手動編譯的方式,可能是因為 Linux kernel 的釋出方式有了許多變化,除了原本的 stable 跟 mainline 還另加入了 longterm 的支援, 而 Ubuntu 的 Kernel team 本來就有準備一個 http://kernel.ubuntu.com/~kernel-ppa/mainline/ 上面備份了所有的 mainline kernels, 所以就繼續沿用這樣的名稱,但其實這上面還包括了 stable 跟 longterm 後來所有的版本。

總之 http://kernel.ubuntu.com/~kernel-ppa/mainline/ 上面放的是沒有 Ubuntu 額外加料的原始 kernel 版本,只是都編譯成了 Debian package, 所以想要使用的人可以直接下載來安裝就可以使用了,而這些 kernel 如果在安裝使用上會有什麼問題,當然也不會在 Ubuntu 的支援之中,這些 kernel 的存在只是用來測試的,藉由安裝不同的版本來找出問題是在哪兩個版本之間發生的,或是在哪兩個版本之間解決的,進而幫助開發者縮小問題發生的地方,來找出相關合適的修補檔。

但是這樣不斷地手動下載安裝,也是很麻煩的,所以我寫了一個小工具來幫忙,它就叫做 mainline-kernels.sh,下載後像下面這樣執行就可以看到使用說明:

$ ./mainline-kernels.sh --help
Usage ./mainline-kernels.sh:
    -h|--help       The manual of this script
    -f|--from NUM   Lower bound of kernel version
    -t|--to   NUM   Upper bound of kernel version
    -l|--list       List available kernel versions
    -r|--remove     Remove mainline kernels

可以先使用 ./mainline-kernels.sh --list 來找出現在有哪些 kernel 可以使用。

$ ./mainline-kernels.sh --list
2.6.15               2.6.24.7             2.6.24                       2.6.25               2.6.26               2.6.27.47-intrepid
2.6.27.58-intrepid   2.6.27.59-intrepid   2.6.27.60-intrepid           2.6.27.61-intrepid   2.6.27.62-intrepid   2.6.27
2.6.28.10            2.6.28               2.6.29.6                     2.6.29               2.6.30.10            2.6.30
...
3.15~rc3-utopic      3.15~rc4-utopic      3.15~rc5-utopic              3.15~rc6-utopic      3.15~rc7-utopic      3.15~rc8-utopic
3.15-utopic          3.15.1-utopic        3.15.2-utopic                3.15.3-utopic        3.15.4-utopic        3.15.5-utopic
3.16~rc1-utopic      3.16~rc2-utopic      3.16~rc3-utopic              3.16~rc4-utopic      3.16~rc5-utopic

然後直接安裝想要的 Linux kernel

$ ./mainline-kernels.sh 3.16~rc4-utopic 3.16~rc5-utopic

或是指定一個範圍來安裝

./mainline-kernels.sh --from 3.15~ --to 3.16

或是什麼都不指定直接執行,之後再慢慢從選單上面挑選。

./mainline-kernels.sh

最後再將安裝的 Linux kernel 移除掉。

./mainline-kernels.sh --remove

要提醒的一點是,這邊的版本號碼是遵循 Debian version 的規則,所以波浪符號有特別的意義,可以參考我以前的文章

最後分享一下 Ubuntu to Mainline kernel version mapping,結束這一回合。

2014年5月28日 星期三

使用 virt-manager 透過 URL 安裝 Debian/Ubuntu 系統

常常需要快速地安裝不同版本的 Debian/Ubuntu 的 VM 環境,但是卻又覺得老是在那裡下載 ISO 還是設定 PXE 也很麻煩,那麼有沒有更簡便的安裝方式呢?於是就搜尋了一下,還真的有方法可以達成,以下利用 Debian/Ubuntu installer 內建的 tasksel 機制來安裝一個 openssh-server 為例。

首先是安裝 qemu 相關的軟體套件。

sudo apt-get install virt-manager qemu-kvm qemu-system python-spice-client-gtk

然後再重新登入帳號,讓 libvirtd 的權限生效。

接下來就可以執行 virt-manager 這個應用程式來新增 VM 指定使用網路安裝

接下來將 http://free.nchc.org.tw/ubuntu/dists/precise-updates/main/installer-amd64/ 這樣的網址輸入進去,並且自訂 tasks=openssh-server gfxpayload=800x600x16,800x600 -- quiet 這樣的內核選項。

然後設定一下記憶體使用量跟 CPU 數量。

接著設定一下硬碟大小。

最後結束前看看需要不要在開始安裝前,使用自訂組態進行最後的微調,如果不要直接按完成就可以了。

接下來的動作就是 Debian/Ubuntu installer 原本的安裝過程,如果想要更進一步自動化安裝流程的話,則可搭配使用 preseed.cfg 跟我在 http://fourdollars.github.io/d-i/ 上面所使用的機制一樣。

以此類推,如果想要安裝哪一個 Debian/Ubuntu installer 的版本,只要輸入相對應的 URL 即可,再搭配在 kernel parameter 輸入 tasksel 提供的 task 選項來執行安裝預先設定好的項目即可。

以下是目前 Ubuntu 14.04 上面 tasksel 所提供的 task 選項。

$ tasksel --list-tasks
u server Basic Ubuntu server
u openssh-server OpenSSH server
u dns-server DNS server
u lamp-server LAMP server
u mail-server Mail server
u postgresql-server PostgreSQL database
i print-server Print server
u samba-server Samba file server
u tomcat-server Tomcat Java server
u cloud-image Ubuntu Cloud Image (instance)
u virt-host Virtual Machine host
u ubuntustudio-graphics 2D/3D creation and editing suite
u ubuntustudio-audio Audio recording and editing suite
u edubuntu-desktop-gnome Edubuntu desktop
u kubuntu-active Kubuntu Active
u kubuntu-desktop Kubuntu desktop
u kubuntu-full Kubuntu full
u ubuntustudio-font-meta Large selection of font packages
u lubuntu-desktop Lubuntu Desktop
u lubuntu-core Lubuntu minimal installation
u mythbuntu-desktop Mythbuntu additional roles
u mythbuntu-frontend Mythbuntu frontend
u mythbuntu-backend-master Mythbuntu master backend
u mythbuntu-backend-slave Mythbuntu slave backend
u ubuntustudio-photography Photograph touchup and editing suite
u ubuntustudio-publishing Publishing applications
u ubuntu-gnome-desktop Ubuntu GNOME desktop
i ubuntu-desktop Ubuntu desktop
u ubuntu-usb Ubuntu desktop USB
u ubuntustudio-video Video creation and editing suite
u xubuntu-desktop Xubuntu desktop
u edubuntu-dvd-live Edubuntu live DVD
u kubuntu-active-live Kubuntu Active Remix live CD
u kubuntu-live Kubuntu live CD
u kubuntu-dvd-live Kubuntu live DVD
u lubuntu-live Lubuntu live CD
u ubuntu-gnome-live Ubuntu GNOME live CD
u ubuntustudio-dvd-live Ubuntu Studio live DVD
u ubuntu-live Ubuntu live CD
u ubuntu-usb-live Ubuntu live USB
u xubuntu-live Xubuntu live CD
u manual Manual package selection

至於 Debian 請參考 tasksel-data 裡面的 /usr/share/tasksel/descs/debian-tasks.desc 的內容。

參考資料:Should I use tasksel, tasks in APT or install regular metapackages?

2014年5月26日 星期一

在 Ubuntu 14.04 上面使用自然人憑證報稅

由於寫這一篇文章的時候,自然人憑證用戶端元件 (npHiPKIClient-linux-etax.xpi) 並沒有提供 amd64 的支援,於是我就去下載 ubuntu-14.04-desktop-i386.iso 回來在 Ubuntu 14.04 amd64 上面使用 usb-creator-gtk 來製作一個 Ubuntu 14.04 i386 的安裝隨身碟,然後再使用這隻隨身碟使用英語介面來開機啟動 Ubuntu 14.04 i386 的 Live System。

首先是加入使用 ppa:webupd8team/java 這一個 PPA

然後是使用 software-properties-gtk 來改變軟體更新的來源到臺灣比較快的站台。

然後就可以執行以下指令來安裝 Java 執行環境跟讀卡機所需要的程式。。

sudo apt-get update
sudo apt-get install oracle-java7-set-default pcscd

接下來我所使用的是 EZ-100PU 這個讀卡機,所以要到廠商的網站上面,下載所需要的驅動程式來安裝,EZ-100PU 這個讀卡機在各大購物網站上都可以買到。

安裝完驅動程式後再重新啟動 pcscd 就可以馬上使用讀卡機了。

然後就是啟動 Firefox 去安裝 自然人憑證用戶端元件 (npHiPKIClient-linux-etax.xpi),然後再重新啟動 Firefox 即可。

接下來的動作就是將自然人憑證接到讀卡機上面,然後連上 綜合所得稅電子結算申報繳稅系統,使用自然人憑證 IC 卡登入,依照上面提示的步驟執行即可。

參考資料:使用 Ubuntu 14.04 電子申報綜合所得稅我在 Linux 桌面進行「電子申報所得稅」所學習到的事

2014年5月7日 星期三

哪裡可以買到內建 Ubuntu 的電腦?

其實只要搜尋一下,就可以找到各個電腦製造商網站上面的資料了。

Dell
http://search.ap.dell.com/results.aspx?s=gen&c=tw&l=zh&cs=&cat=all&k=Ubuntu
HP
http://h17007.www1.hp.com/us/en/enterprise/servers/supportmatrix/ubuntu.aspx
Lenovo
http://support.lenovo.com/en_US/detail.page?LegacyDocID=MIGR-48NT8D

P.S. 我覺得某些電腦製造商自己網站上面的搜尋功能應該要再加強一下,讓顧客能夠輕鬆找到符合需求的產品,這樣也能夠增加一些收入不是嗎?

2014年2月27日 星期四

Debian package 打包時遇到需要使用 Pre-Depends 來解決問題

最近在使用 Python 的 XlsxWriter 來產生 Excel 檔案。

可是在 Ubuntu 上面只有在 Trusty 裡面才有 python-xlsxwriter/python3-xlsxwriter 可以使用。

但是我自己在使用的是 Ubuntu 13.10 (Saucy) 於是我就先自己從 Trusty 上面抓 Debian source package 回來 backport 到 Saucy 上面使用。

本來想說等到程式寫好的差不多再來 backport 到 Ubuntu 12.04 (Precise) 上面給人家使用,結果卻發現事情並非如此單純,因為 xlsxwriter 這個套件還需要使用 dh-python 來編譯,但是在 Precise 上面根本就沒有這個套件,於是這件事就變成要先去 backport dh-python 到 Precise 上面使用。

想說不然就從跟 Precise 比較接近的 Wheezy 來抓 Debian source package 回來 backport 好了,於是就找到了 wheezy-backports 裡面的 dh-python,原本以為只要抓回來改一下 debian/changelog 再推到 PPA 上編譯完成就可以了,沒想到 dh-python 已經編譯好了,再去修改 xlsxwriter 裡面的 debian/control 加上 dh-python 的相依性來編譯就可以了,結果卻又遇到了下面這段錯誤訊息

running python rtupdate hooks for python3.2...
Usage: py3clean [-V VERSION] [-p PACKAGE | DIR_OR_FILE]

py3clean: error: only one action is allowed at the same time (cleaning directory or a package)
error running python rtupdate hook dh-python
dpkg: error processing python3 (--configure):
 subprocess installed post-installation script returned error exit status 4
dpkg: dependency problems prevent configuration of dh-python:
 dh-python depends on python3 (>= 3.2.3-0); however:
  Package python3 is not configured yet.
dpkg: error processing dh-python (--configure):
 dependency problems - leaving unconfigured
dpkg: dependency problems prevent configuration of python3-all:
 python3-all depends on python3 (= 3.2.3-0ubuntu1.2); however:
  Package python3 is not configured yet.
dpkg: error processing python3-all (--configure):
 dependency problems - leaving unconfigured
Processing triggers for libc-bin ...
No apport report written because the error message indicates its a followup error from a previous failure.
ldconfig deferred processing now taking place
Errors were encountered while processing:
 python3
 dh-python
 python3-all
E: Sub-process /usr/bin/dpkg returned an error code (1)

後來追查了一下才發現,原來 dh-python 在 python3 還沒有安裝好的時候會去執行 py3clean 才導致這個問題的發生,於是查了一下 Debian Policy Manual,發現在 7.2 Binary Dependencies 這一章節提到 Pre-Depends 可以使用來解決我遇到的問題。

於是我就再修改一下 dh-python 將 ${python3:Depends} 移到 Pre-Depends 上面,等 dh-python 推上 PPA 編譯完成後,再來編譯 xlsxwriter 這個額外加上 dh-python 相依性的套件,才順利過關。

xlsxwriter backports 的 PPA 放在 ppa:fourdollars/xlsxwriter